

Do It Yourself Trail Camera Mount
October 12 2013 – Shawn OConnor
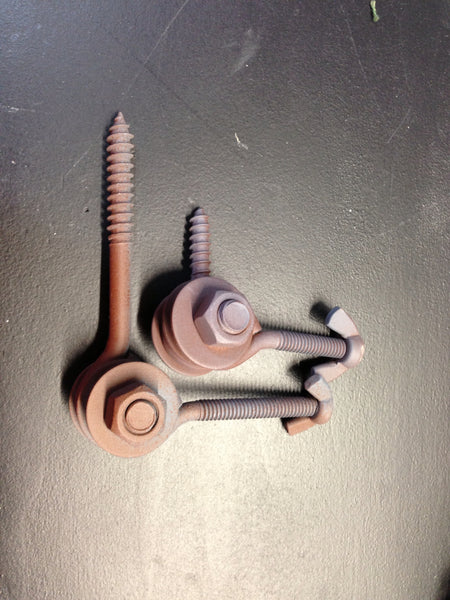
Make these versatile trail camera mounts from items at your local hardware store. They work well, and you can make one for less than $1.
The following step-by-step instructions detail how you can make one of these easy versatile trail camera mounts.

CAMBUSH-covered trailcam on $1 mount. Disguised from trespassers and easy to access.

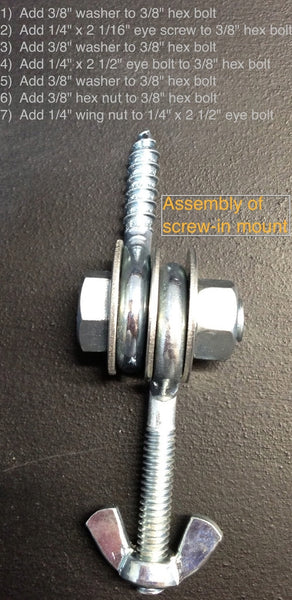

Paint with some flat paint and take them to the woods. I have a number of these in various trees and leave them out year round. This enables me to change camera locations easily, which helps fool would-be thieves who think they know my camera locations. I add CAMBUSH to the camera and it's concealed from view. The length of the eye screw is personal choice. If your camera's tripod mount nut is on the back of the camera, you may want a shorter eye screw. If it is on the bottom of the camera, you may opt for a longer eye screw. Take a cordless drill with you to the woods and drill a pilot hole for the mount. This will make installing the mount easier in the tree, especially for harder species like oak and walnut.
By swapping out the eye screw for another eye bolt and adding 4 foot garden stake you can use this mount on a stake where screwing into a tree is not an option. This option will cost you about $2.50 with the additional garden stake. Paint it a light tan color and you have a great camera mount for a CRP or corn field. Works like a charm.

Another advantage of the stake is that you can set it up with two camera mounts so you can mount two cameras and catch activity on either side of the stake.

31 comments
Awesome idea! I’m going to try using a piece of all thread and wing nut both sides of the eye bolt connection so I don’t have use wrenches. Maybe even try a nylon washer between the eye bolts. Thought about using stainless so it doesn’t rust. Thx again
Great idea and save allot of money
A tip for anyone looking to photograph “two legged vermin” is to mount the cameras up high maybe 10 feet or more, in the shadow under a branch pointing down because the tendency is to not look above 7 feet or so unless something catches your eye. I have had people walk past my cameras & wave at them but not when they are mounted up high. Thankfully I have not lost one yet but the new ones now have passwords or pin numbers.
I have a thief at my cottage…going out there tomorrow with a hidden camera and saw your post..
Just went to Home Depot and for $5..made your mount. Genius!!
Saved me $20 @ Cabellas and cost of gas.
Thank you so very much.
This is a great idea ,cant wait to try it. I just bought some property and its deep in the mountains. Although it looks like no trespassers have been on it, we shall see. Just hope to get pics of a few monster Bucks!
This is brilliant: Thanks for sharing! All the comments are valuable as well.
This is great but why not use a wing nut to connect the two eye bolts as well this way you will have up and down movement on the fly as well.
I have used the t posts upside down so I could use the small included bungee cords to hold the camera to the flat plate.
This is a totally awesome idea! This will come in handy for my trail cameras to catch the neighbor who keeps trespassing on my hunting property but denies it. NOT ANY MORE!!!!
Love it! Thank you for sharing
xcllnt
Wow. Thanks for the great post. Excellent tip.
I was going to order something much more expensive… Thanks for your ideas! Didn’t want to spend the money! Your idea is great!
I priced stainless steel for all parts to this mount at Home Depot & Tractor Supply & it will cost approximately $6.00 per mount + garden stake
I made one for myself similar to this but I used a screw in tree step and welded a washer to the end of the step to mount the eye bolt to. Of course this way you need access to a welder. I need one that will mount to an existing t-post fence post. Thinking of using a short length of pipe that will slip down over the t-post and drill 3 holes and tap them to accept 1/4" bolts so it will tighten on the post. Anyone else got any ideas??
Great idea, thanks
Great idea! Love it!
I seen these and made 3 for myself. The other members seen them and now they want me to make some for them,great idea they work.
Yes sir this will work great for me. going to buy hardware now.
Thanks, great idea.