

Do It Yourself Trail Camera Mount
October 12 2013 – Shawn OConnor
Make these versatile trail camera mounts from items at your local hardware store. They work well, and you can make one for less than $1.
The following step-by-step instructions detail how you can make one of these easy versatile trail camera mounts.

CAMBUSH-covered trailcam on $1 mount. Disguised from trespassers and easy to access.

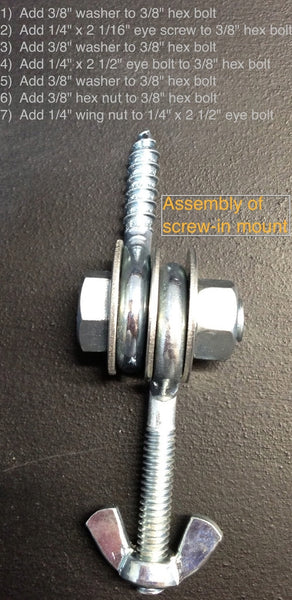

Paint with some flat paint and take them to the woods. I have a number of these in various trees and leave them out year round. This enables me to change camera locations easily, which helps fool would-be thieves who think they know my camera locations. I add CAMBUSH to the camera and it's concealed from view. The length of the eye screw is personal choice. If your camera's tripod mount nut is on the back of the camera, you may want a shorter eye screw. If it is on the bottom of the camera, you may opt for a longer eye screw. Take a cordless drill with you to the woods and drill a pilot hole for the mount. This will make installing the mount easier in the tree, especially for harder species like oak and walnut.
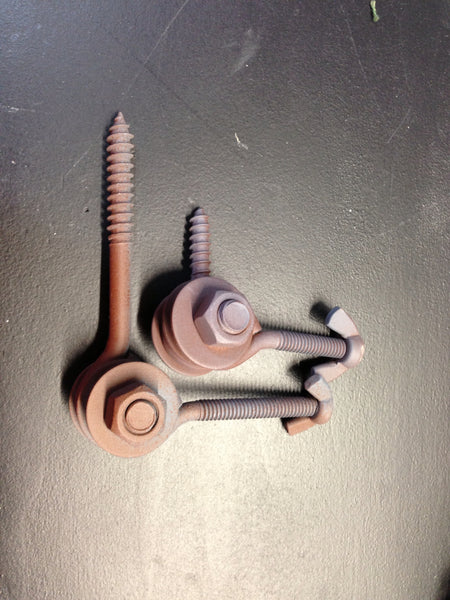
By swapping out the eye screw for another eye bolt and adding 4 foot garden stake you can use this mount on a stake where screwing into a tree is not an option. This option will cost you about $2.50 with the additional garden stake. Paint it a light tan color and you have a great camera mount for a CRP or corn field. Works like a charm.

Another advantage of the stake is that you can set it up with two camera mounts so you can mount two cameras and catch activity on either side of the stake.

31 comments
Looking to make some variation of this at a quail feeder. I want to mount trail camera to look down from about 5-6 feet above feeder. I’ll let you know what I come up with. Great idea.
I have made some like this for many years. You have taken it to another level. Thanks for the up grade
Your a genius. Gonna make me some.
How does it attach to camera?
DAMMM!!!! You rock man! I’m so happy that someone really isn’t trying to make money for something so simple. I was brainstorming today and found this thank you! Very cool idea.
Plan to make one soon. You may want to add that the eye bolt thread needs to be a 20 thread to fit the camera theads.
Wow nice job . Thanks
I was way over thinking how to build my own camera brackets. This so simple I can’t believe I didn’t think of it since I’m half simple. Great idea! You saved me time and money. Thanks
Great idea. I’ve been thinking about different ways to mount my new camera and here it is! Makes sense, easy to put together and the cost is great! Good job guys!!
Bob
Marion, AR
Thanks for this. Saved me a bunch of time and money. Great idea.
For those of you interested, here is the cost break down of the screw in mount. I use zinc plated metal.
24 pack of 3/8″ × 1″ hex bolt = $2.28 or $.10 per mount
76 pack of 3/8" flat washers = $2.28 or $.09 per mount
24 pack of 3/8" hex nut = $2.28 or $.10 per mount
24 pack of 1/4" wing nut = $3.49 or $.14 per mount
3 pack of eye screw = $.99 or $.33 per mount
eye bolt = $.39 per mount
4’ garden stake = $2.99
Total cost for screw-in mount = $1.15
Total cost for stake mount = $4.14